miniDSP - The toolbox for speaker optimization

Even if you have the perfect loudspeaker, in most cases there is a desire to tweak at least a little bit of the timbre or to soften a strong room mode. And at the latest when you want to integrate one or more subwoofers, the question arises of how to adapt the phase. The way to the perfect sound inevitably leads past EQ and crossover.
Occasionally, active speakers have already provided some knobs on the back for subtle (cosmetic) adjustments. If the interventions are to go a little deeper, a small DSP with various modules such as level, EQ, delay, high pass and low pass is recommended.
The miniDSP is just such a toolbox in a handy miniature format and at an affordable price (approx. 200 EUR). A stereo input is common to all formats. The formats and the number of outputs differ depending on the model:
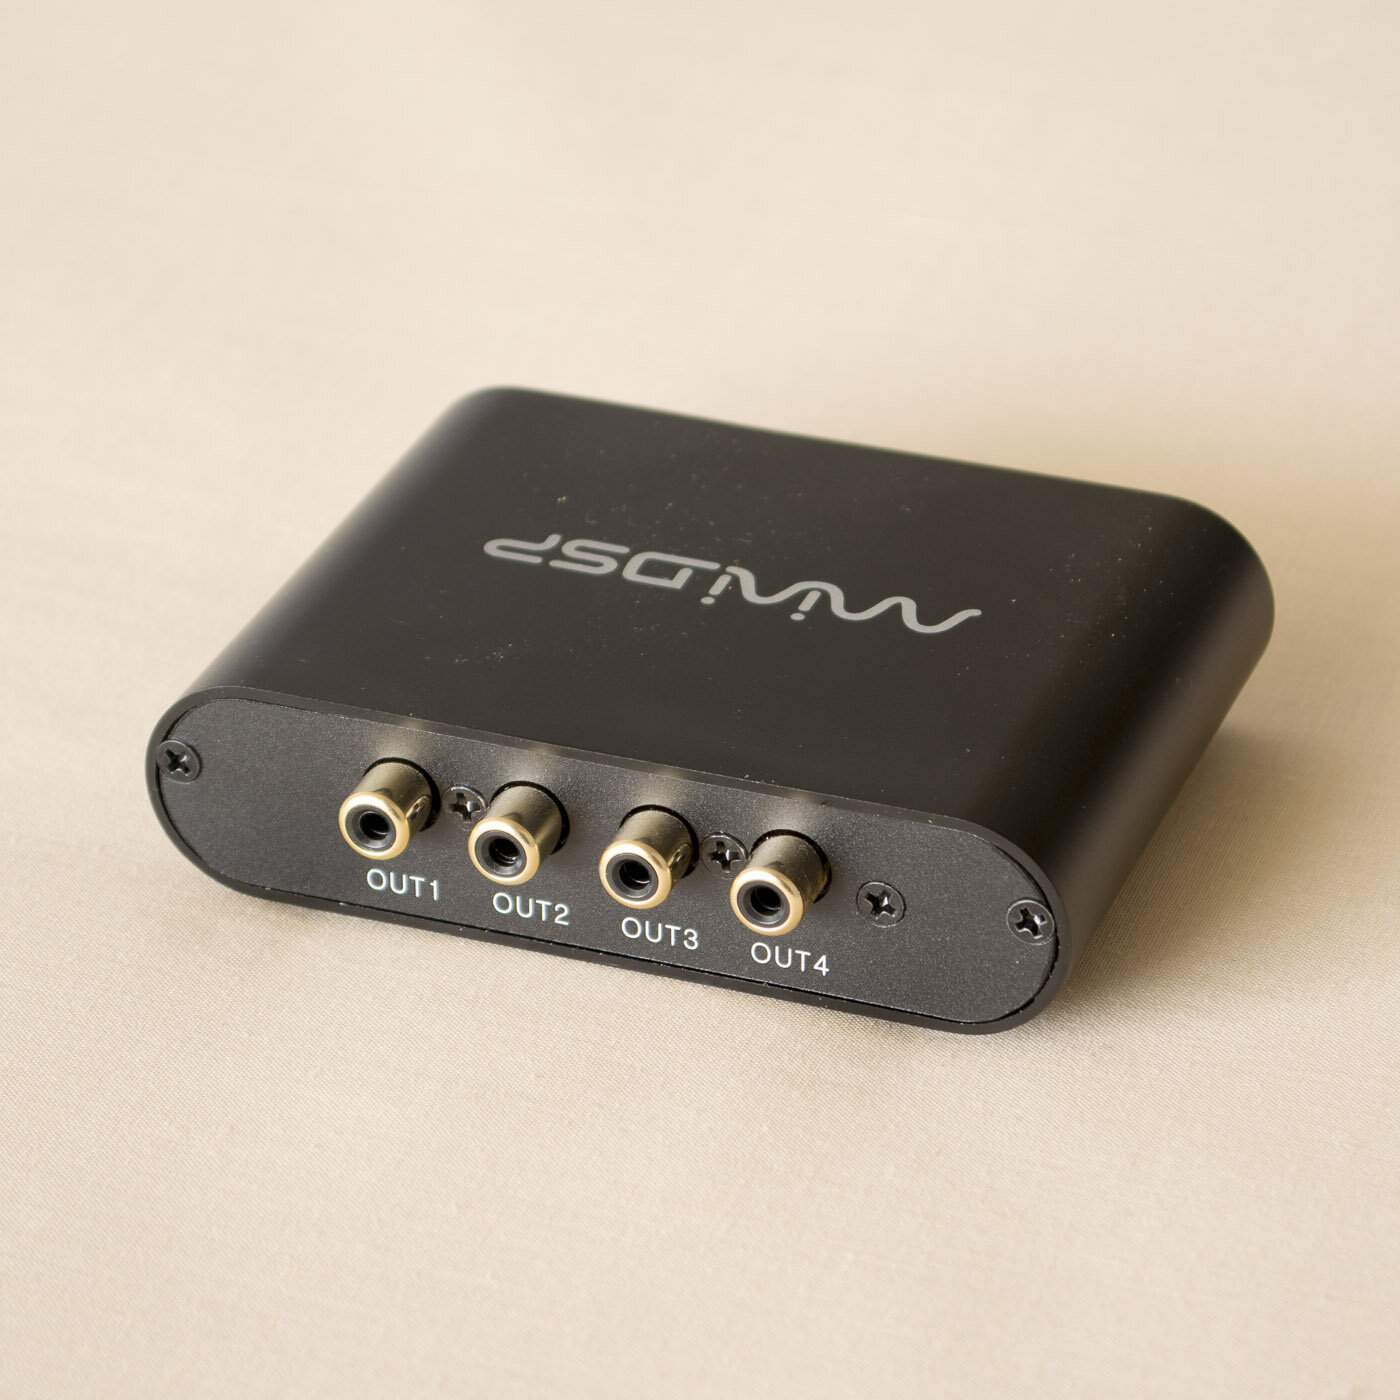
miniDSP 2x4 HD*
Inputs: 1x Stereo (switchable 2x RCA Analog or 1x Toslink)
Outputs: 4x (Mono-)Analog (RCA)
miniDSP 2x8 nanoDIGI
Inputs: Stereo Digital (switchable SPDIF RCA or Toslink)
Outputs: 4x Stereo Digital (SPDIF RCA)
Since I have completely digitally integrated my speakers (2x Genelec 8331 and 2x Genelec 7350) *, I am currently using the 2x8 nanoDIGI. With short cable lengths, it is usually not a problem to convert from SPDIF to AES / EBU using simple cable adapters like this.
Even if you primarily listen to CDs and your CD player has an SPDIF output, there is still the question of how you want to check the settings on the miniDSP using measurements. While most audio interfaces have an analog output and the integration of a miniDSP 2x4HD seems unproblematic, this is not entirely trivial for the purely digital 2x8 nanoDIGI. At best, you should have an audio interface that has a digital output.
Scope of delivery

Fortunately, everything you need for operation is included:
Power supply 5V with plug-in adapters for different countries
USB connection cable
The manufacturer will activate the download of the software as soon as you have registered and processed the purchase via your account. The download package includes software for both Windows and Mac.
After installation, you simply connect your laptop to the miniDSP via USB and you can connect and make the desired settings. Important to know: you can only configure in one direction, namely from the PC to the device. The configuration cannot be downloaded and changed from the device afterwards. It is therefore best to always save the configuration on your PC so that you do not have to start over from the beginning when making changes.
You can remove your laptop after the settings have been made. Thanks to the external power supply, the miniDSP works completely independently and retains the settings until the next change.
DSP modules - What exactly does the miniDSP offer?
Since I only own the 2x8 nanoDIGI, I can only show corresponding screenshots from this software. According to the manual, the parameters for the 2x4 HD are almost identical.

Input parameters
The input parameters can be set on the first of the three pages. Which includes:
Input selection (SPDIF or TOSLINK)
Level (0dB to -70dB)
Parametric EQ (5 bands, each Peak, HiShelf or LoShelf, +/- 16dB)
Mute
Routing
The second page offers intervention options in the routing. By default, the left input signal is routed to all left outputs and the right signal to all right outputs. This can be changed if you only use one mono input and want to route it to all outputs, for example for subwoofer arrays.

Accordingly, there are only 4 outputs on the 2x4HD.
Output parameters
Here it is finally getting exciting: various modules are available to adapt each output individually with great precision:

Level (0dB to -70dB)
Xover (high pass and low pass, each of the following types can be selected:
Butterworth: 6dB, 12dB, 18dB, 24dB, 36dB, 48dB per octave
Linkwitz-Riley: 12dB, 24dB, 36dB, 48dB per octave
Bessel: 12dB per octave
Parametric EQ (5 bands, each Peak, HiShelf or LoShelf, +/- 16dB)
Mute
Invert (phase shift)
Delay (0ms to 9ms, in 0.01ms steps) [the 2x4HD can 80ms according to the manual - without guarantee]


Thus, all elementary building blocks are available that could be used to optimize your speakers. A compressor was mentioned in the manual for special models / firmware, but this was not available in my 2x8 nanoDIGI model.
Examples of use
I would like to show you for which purpose I would use the miniDSP based on three specific scenarios:
1) Sound optimization stereo speakers
In the simplest case, we enter the miniDSP in stereo and also leave the miniDSP in stereo. The sole purpose is to use the equalizer to optimize the frequency response.
As a rule, we should set the left and right channels approximately the same with a symmetrical arrangement in the room. The EQs can be coupled between two channels so that you don't have to enter each parameter twice.
But an individual EQ setting for both channels is also possible if one speaker is closer to a wall or in a corner than the other and a different equalization in the bass range seems reasonable.
Five bands are not exactly lush. However, the miniDSP has 5 bands in the input and 5 in the output. So we can use a full 10 bands for stereo use. And I think this is sufficient in most cases.
2) Adjust the phase between the main speakers and subwoofer
A difficult topic and in my view the most important area of application for the miniDSP! The manufacturers of subwoofers unfortunately make it very easy - too easy in my opinion. Many professional studio subwoofers only have a simple phase reverse switch on the back. After all, a few have a four-way switch between 0 degrees, 90 degrees, 180 degrees and 270 degrees. However, when adapting a crossover there is much more than just the extremes 0 degree and 180 degrees!
But how should one experience this and try it out without suitable setting options? This is where the miniDSP comes into play. And that's exactly why I bought it for me.
A loudspeaker and a subwoofer sound very good on their own. It only becomes difficult when you add them up. Even if you use the crossover that is often built into the subwoofer and split the signal, for example at 80Hz, both speakers overlap at least in the range 60-100Hz, sometimes even more.
If both signals arrive at the listener at the same time, both speakers add up. That is the goal! However, this is not always possible for practical reasons. You could already set the phase perfectly just by moving the speakers. The subwoofer is usually slightly behind, so it should be placed a few centimeters in front of the main speakers.
In most living rooms, the subwoofers (partly for good acoustic reasons) are rather hidden behind the speakers in the corner. And which speaker would you have to delay so that both arrive at the listening position at the same time? Right, the main speaker - and not the subwoofer.
The miniDSP provides a separate delay for each output. As a result, you can try out whether you want to use the delay for the main speaker or for the subwoofer to approach the frequency response that is as flat as possible at the crossover frequency. And flat here means: maximum addition.
However, it is necessary to use the crossover within the miniDSP and not the one in the subwoofer. Because you want to supply the mains and subs with a separate signal. From my point of view, this only brings advantages. Because the setting of the crossover frequency can be adjusted much more precisely and comfortably with the miniDSP editor than lying on the floor and turning a potentiometer on the back of the subwoofer. And different scenarios can be tried out and switched over while listening to and assessing the whole thing from the listening position.
As a small insight into this process, here is a screenshot of my first attempt with the miniDSP. The crossover frequency of the filters is 90Hz.

The red curve shows the bad addition without time adjustment (0ms). A delay of 4ms for the main speaker in my case delivers the best addition in the entire transition range from 65-125Hz (green curve). And this adjustment gives an improvement of at least 6dB at the crossover range!
If the phase cannot be adjusted by physically moving the speakers, a toolbox like the miniDSP is an effective and precise alternative in my view.
The only restriction: with the 2x8 nanoDIGI the delays are limited to 9ms. This enables a compensation of about 3m distance. If the distance from the listening position between the main loudspeaker and subwoofer is more than 3m, then the nanoDIGI reaches its limits. The 2x4HD promises more here, but you may have to accept another AD / DA conversion.
And if everything is adjusted in time, the 5 EQ bands can of course still be used as explained in Application 1) to optimize the frequency response.
Subwoofer arrays
Subwoofers can not only be operated directly next to the main speakers, but can also be distributed anywhere in the room. To make the most of this approach, however, you should experiment with the level and delay of each individual subwoofer as before and try to achieve the best possible addition in the listening area.
Due to the 4 analog (2x4HD) or 8 digital (2x8 nanoDIGI) outputs, the miniDSP is well equipped to help out for this application. As a rule, all subwoofers will be fed with a mono signal, which can be done on the routing page.
With the individual EQs in each output, each subwoofer can also be equalized individually. Again, the technical limitation for the 2x8 nanoDIGI: due to the short length of only 9ms, only small and medium-sized rooms can be optimized accordingly. If the differences in loudness to be compensated exceed a length of 3m, the 2x8 nanoDIGI unfortunately does not offer suitable delays. In particular, the so-called double bass array, in which subwoofers are positioned on the rear wall and emit the sound out-of-phase as soon as the first wave front arrives, cannot usually be set up with only 9ms delay.
Four presets: Easy comparison
As a useful extra, four independent presets can be stored in the miniDSP. So you can create different variants of your EQ or crossover and then easily switch and compare.
Optional: remote control
For the sake of completeness, I would like to mention the optional remote control, with which the four presets can be switched, the volume can be adjusted and the input can also be selected. Since I currently control the volume of my Genelec loudspeakers via the GLM volume control *, I do not use the remote control.
Optional: USB microphone
The manufacturer offers a USB microphone for an additional charge of USD 75. Since I am already well equipped with measuring microphones, I did not choose this option. If you don't have any measuring equipment yet, this can be an easy way to get into this area. Because due to the USB connection, you would not need to buy an audio interface.
To use the miniDSP, you should have the option of taking measurements yourself. Of course, you can also set all parameters "blind" by ear. But a lot of things only really become clear when you can also look at various options from a measurement perspective. This applies to the setting of the equalizer as well as delay times.
The REW (Room EQ Wizard) software is ideally suited for room acoustic measurements and is even free of charge. In principle, it hardly matters whether you use this miniDSP USB microphone or another one. The differences between measurement microphones are very small, as I explained here.
As an alternative to the USB microphone, you can also use this Behringer measurement microphone * for a similar price and, for example, a Focusrite audio interface*. This has the great advantage that you can extend the measuring microphone as desired using conventional microphone cables (XLR) and even get to the farthest corner of your room. With USB cables you are always very limited near your PC.
Order
I ordered my miniDSP directly from the manufacturer. You have to know that the goods (at least in my case) are shipped from Hong Kong. This is not a problem thanks to UPS Express, but in most countries there is an additional import sales tax (e.g. in Germany 19%).
Usually, the miniDSP devices are also available from Amazon* and, in the case of a national seller, are therefore uncomplicated and without any surprises regarding tax and shipping fees.
Advantages
I have not yet found a comparable device that has four or eight independent outputs with its own EQ, polarity switch and delay in the price range of EUR 200. For any optimization at home, the miniDSP is an extensive and, in my opinion, sufficient toolbox. And thanks to the external 5V power supply, the device can also be operated without a laptop after setup and can be easily hidden due to its small size.
Disadvantage
There is not much I would improve. A big limitation for me is the short length of the delay of only 9ms. You can use it to adjust a lot, but not everything. A distance difference of the equivalent of 3 meters (9 ft) will unfortunately quickly be reached in large rooms.
It is also not quite perfect that the nanoDIGI apparently always converts the input signal to 96kHz using a sample rate converter and the output is therefore only available in 96kHz. I still prefer this than if a 44.1 kHz signal is first sampled up and then down again. But I would have preferred to adjust the internal DSP to the input sampling frequency.
Due to the two inputs, the miniDSP models mentioned are only suitable for stereo applications. The very similar miniDSP 10x10HD (19 ”, analog, 600 EUR) or the more expensive DDRC-88D (digital, 900 EUR) would be suitable for surround measurements.
All in all, I am very happy with the new possibilities that the miniDSP offers me. With the four stereo outputs, I am now sufficiently prepared to be able to build an array of four subwoofers in the future for an even better low-frequency response and less mode excitation.
Small footnote: If you are wondering why I am not using the GLM software for Genelec for these adjustments: Genelec unfortunately does not offer any possibility for a phase shift in its digital subwoofers. You can set the phase in the subwoofer in 15 degree steps (= 0.5ms steps). However, the 180 degree setting is not a real phase shift, but only a delay of 6ms.
* Affiliate-Link
This might also be interesting for you:
Blog-article: Measurement Microphone Comparison
Blog-article: Useful switch features for Dante application
Blog-article: How to measure room modes with REW (freeware)