Before and after comparison of broadband absorbers (part 2)

Hello and nice that you are back for the second part! If you have not yet read the first part on the measurement results of broadband absorbers, I recommend that you read it first before continuing: before and after comparison (part 1)
After I was very satisfied with the measurements in the last week (not to say enthusiastic!), It was obvious to immediately follow the next step and to venture into a ceiling construction.

As always, I'm concerned with the acoustic test. I am far too curious as to what it sounds like to spend months on woodworking!
Therefore, first the simplest variant as a ceiling cloud, which is placed on the existing absorbers. Later it can still be discussed whether there will be a wooden structure under it or whether the whole thing will be hung on the ceiling.
But this decision can be made much better if you have the object in front of you in real life and also know the actual weight. Better to take a small step every week than to get bogged down with details during the planning - Rome wasn't built in a day, either!
And if you read this later, you can read all blog articles on this topic in one day anyway!
The Ceiling Panel
The filling material is 100% identical to the previous absorbers, namely 20cm Rockwool Airrock ND (50kg / m³). [Addendum: if I had the choice again today, I would probably use a slightly lighter material with a lower flow resistivity. I wrote more about absorber material in a separate blog article.]
Since I had to overcome a length of 3m, I decided here for a continuous beam for weight reasons and did not use a wooden frame for each individual absorber. In addition, I packed every stone wool packet in thin cover film so that my living room can be made cozy again as quickly as possible and no rock wool particles fly through the air. The low reflection that I buy with it for high frequencies was not really bad for me. The speakers radiate primarily towards the rear wall and not towards the ceiling. I also plan to stretch a light fabric in front of it later, which will reduce the reflections somewhat.

In case you want to know exactly: there is about 8cm of air between the ceiling and rock wool. This is acoustically advantageous because it shifts the lower cut-off frequency down to which the rock wool still absorbs somewhat. If you have enough space, it is always advisable (whether on the walls or on the ceiling) to leave some space - it costs nothing!
A detailed description of how I built this ceiling cloud will probably follow in the next week. Speakers and measuring microphones have remained in the same place in the before / after comparison. Only the rockwool packages have been added.
Here is a video in time lapse of what has changed between measurements:
Improve the frequency response The measurements in the last week had shown that we can achieve sound absorption down to 50Hz with the 20cm mineral wool. As the absorbers were previously only positioned on two walls, as expected only a few, but not all, room modes were suppressed. So let's take a look today at whether treating the ceiling can improve further outliers in the frequency response!
Incidentally, the measurements and diagrams are again created with the EASERA software. And as speakers this week my new Genelec 8331 (Thomann*) with the subwoofers Genelec 7350 (Thomann*) will be used. Apart from the adjustment of the phase, no correction has been made using GLM.
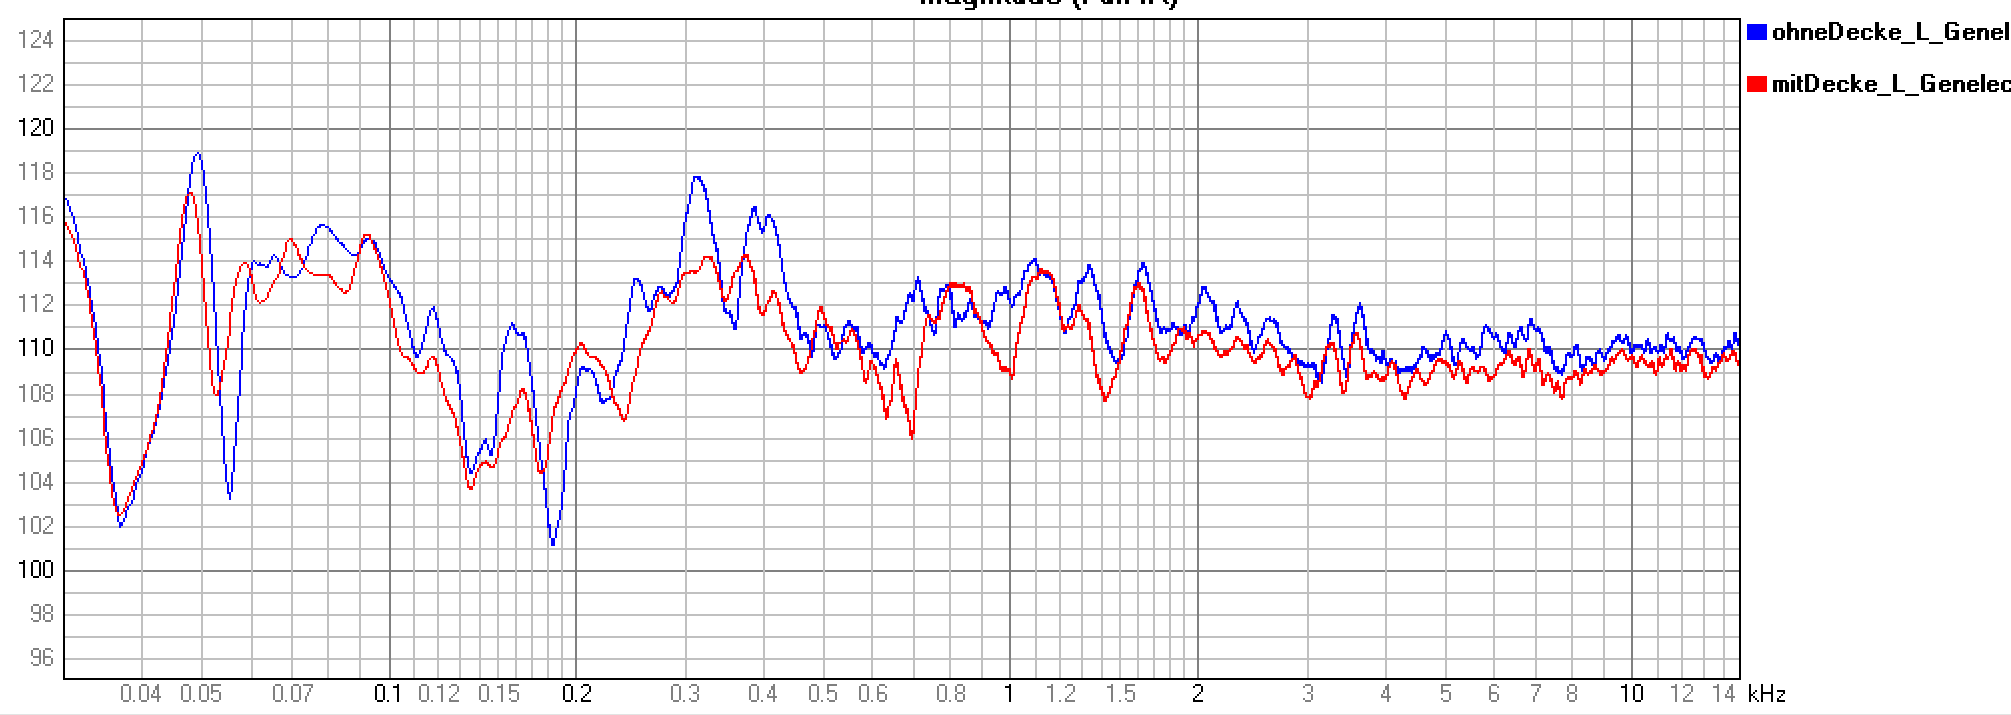
When looking at the complete frequency response, the first thing you notice is that the ceiling absorber takes a little bit of sound energy out of the room. In the high frequency range, the total level with ceiling sail (red curve) is estimated to be 0.5dB to 1dB below the measurement without ceiling sail (blue curve).
Like last time, the smoothing of the curve that we get from the ceiling absorption is gratifying. In addition to the bass range, which we will discuss in more detail shortly, the outliers up and down are significantly reduced, particularly in the range 150 Hz to 500 Hz.
But now to the real highlight! In part 1 we still had a very clear extinction at 58Hz despite the quite abundant amount of absorbers on the front and back wall. Let us now take a closer look at whether the suspicion of a ceiling reflecion between is true:
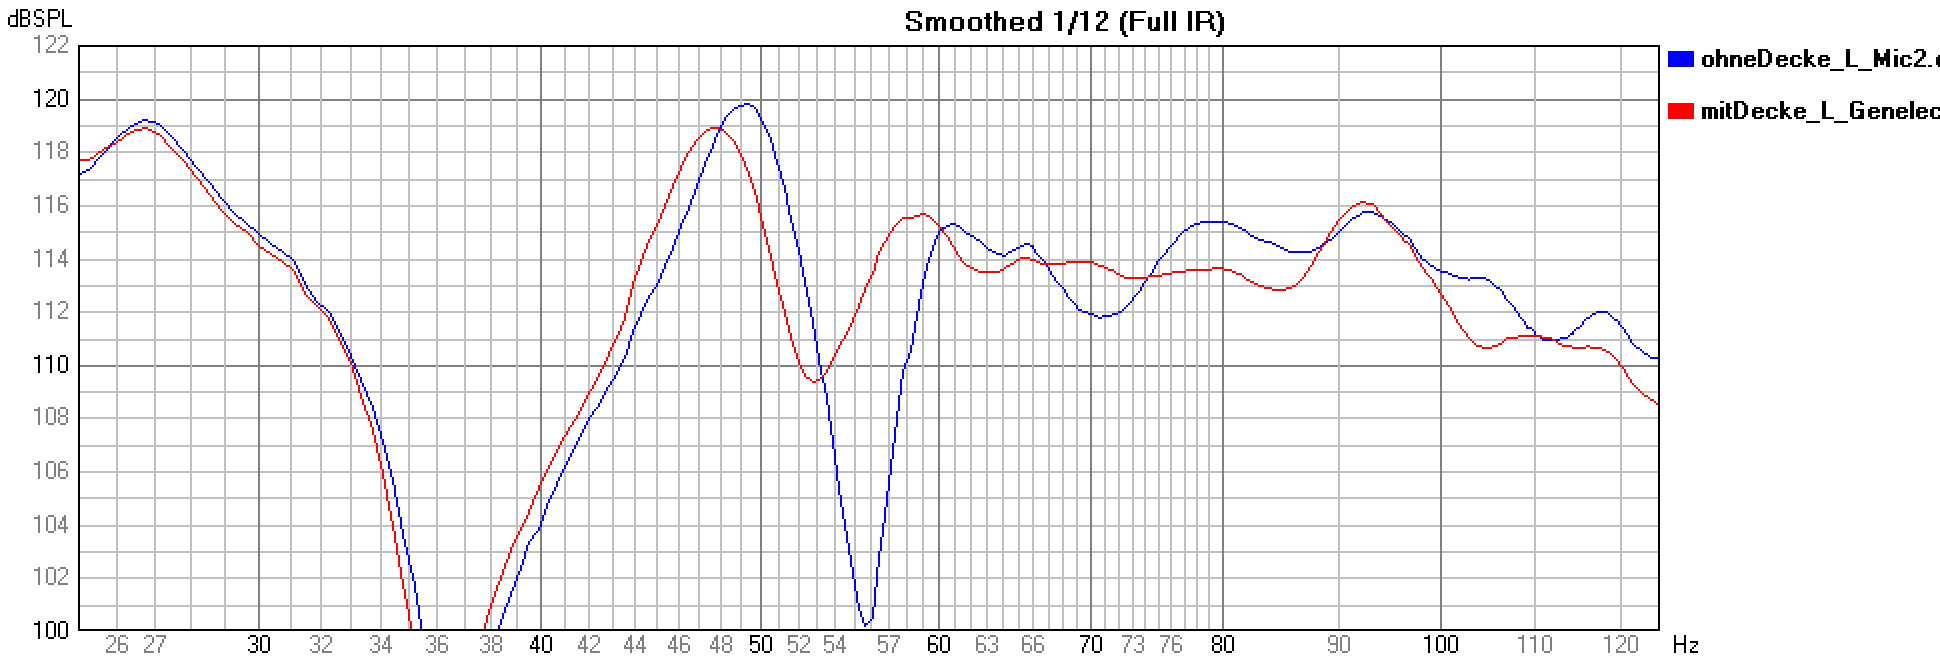
And indeed: the extinction at 58Hz has disappeared! It not only makes me happy that my theory worked out and hope was justified. It is also extremely gratifying that the absorber still has a effect even at 50Hz!
Small side note: I already know where the cant at 49Hz comes from. Since I occasionally open the large window front, I could already see that the elevation is related to a room mode in the transverse direction. I don't know exactly yet, but I will certainly come up with an absorber-technical solution for this soon!
Reverberation impact
The biggest difference in the reverberation time is certainly the moment when the first absorbers are placed in a previously empty room. Each additional absorber then brings less and less change. Nevertheless, I would like to show you again the influence on the reverberation time (T30) with today's update.
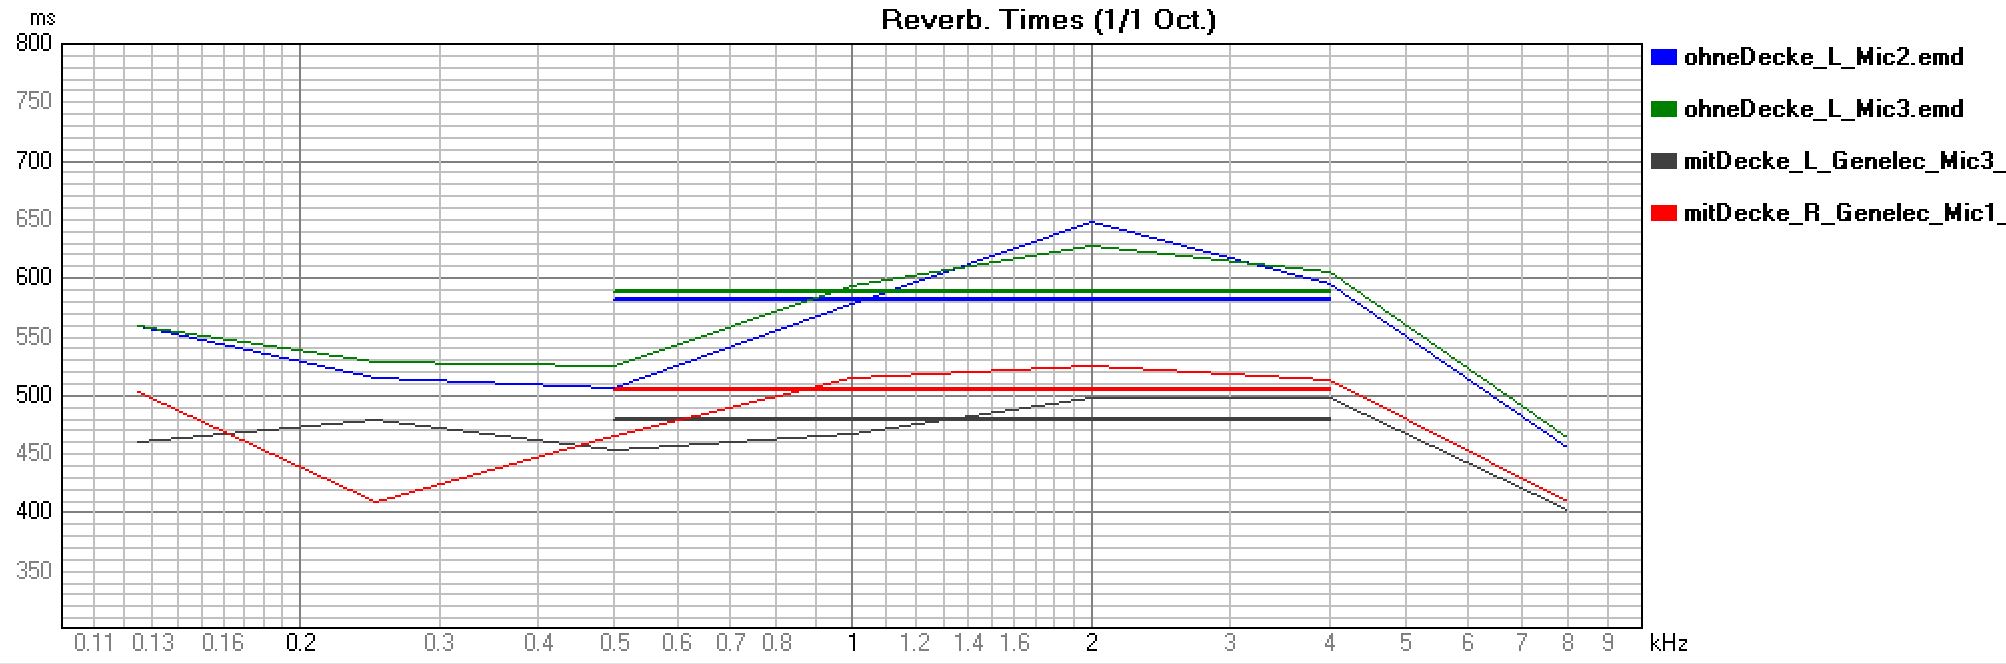
While we were around 0.6s with the 12 absorbers, we are now at 0.5s with the additional ceiling absorber.
My conclusion
Wow! The sun is slowly rising in my living room - or the curtain opens to the big stage! Due to the lack of ceiling reflection, the precision with regard to imaging and depth grading is also significantly better. You suddenly hear details in recordings that you have never heard before!
Admittedly, the effort so far is of course a trace of what you normally do in your living room. But it's so worth it! What use is a loudspeaker for 10,000 euros if the room completely chops up the beautiful laboratory frequency response ?!
The nice thing about room acoustics is that the materials are really affordable. If you buy everything in the hardware store and do a weekend yourself, you can bring your listening situation to a level for a few hundred euros that is normally only granted to mastering studios.
Why should only professional sound engineers be allowed to celebrate this musical delight? I would like to advise you at this point: before you next want to spend money on an update of your speakers or your amplifier (whether for your living room or for your recording studio), think about a few acoustic modules for a moment don't have a bigger effect on sound quality! Or you simply invest in new speakers AND room acoustics!
Outlook
A big step has been accomplished with the 12 absorber modules and the ceiling panel. Nevertheless, the journey continues, of course. There are still many ways to optimize! The measurements have shown that even in the transverse direction there are still room modes that should be damped. In addition, I will experiment whether a different position for the subwoofers brings further improvement. You can read, calculate and simulate a lot here. Ultimately, what counts for me is the measurement and hearing result. As soon as the room acoustics are halfway there is the big chapter of loudspeaker equalization.
And one day (hopefully in a few weeks) stereo will of course become surround! So look forward to an exciting and probably educational time!
Blog-article: Before and after comparison of broadband absorbers (part 1)
Blog-article: DIY broadband acoustic absorber
Blog-article: DIY ceiling cloud
Blog-article: Rock wool, glass wool, hemp - which material is best suited for absorbers?
* Affiliate link